

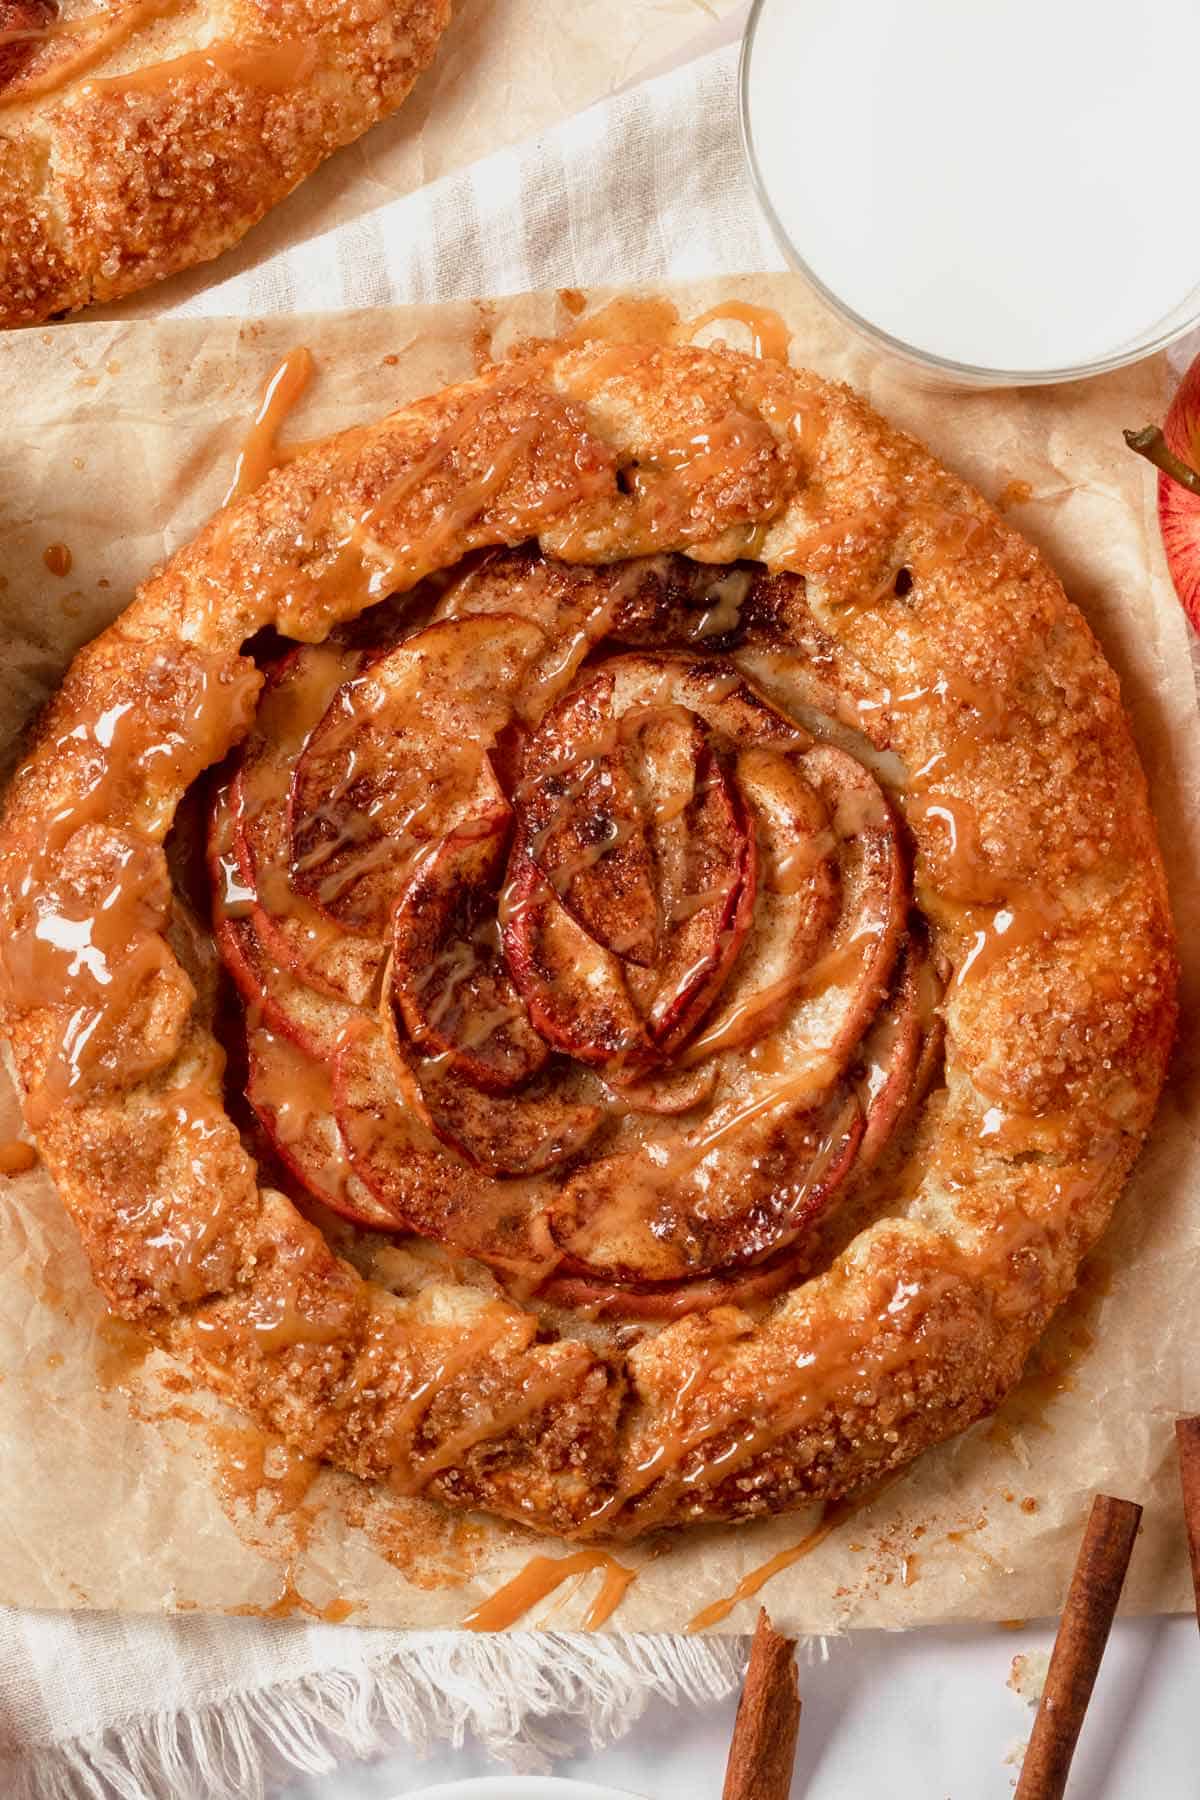
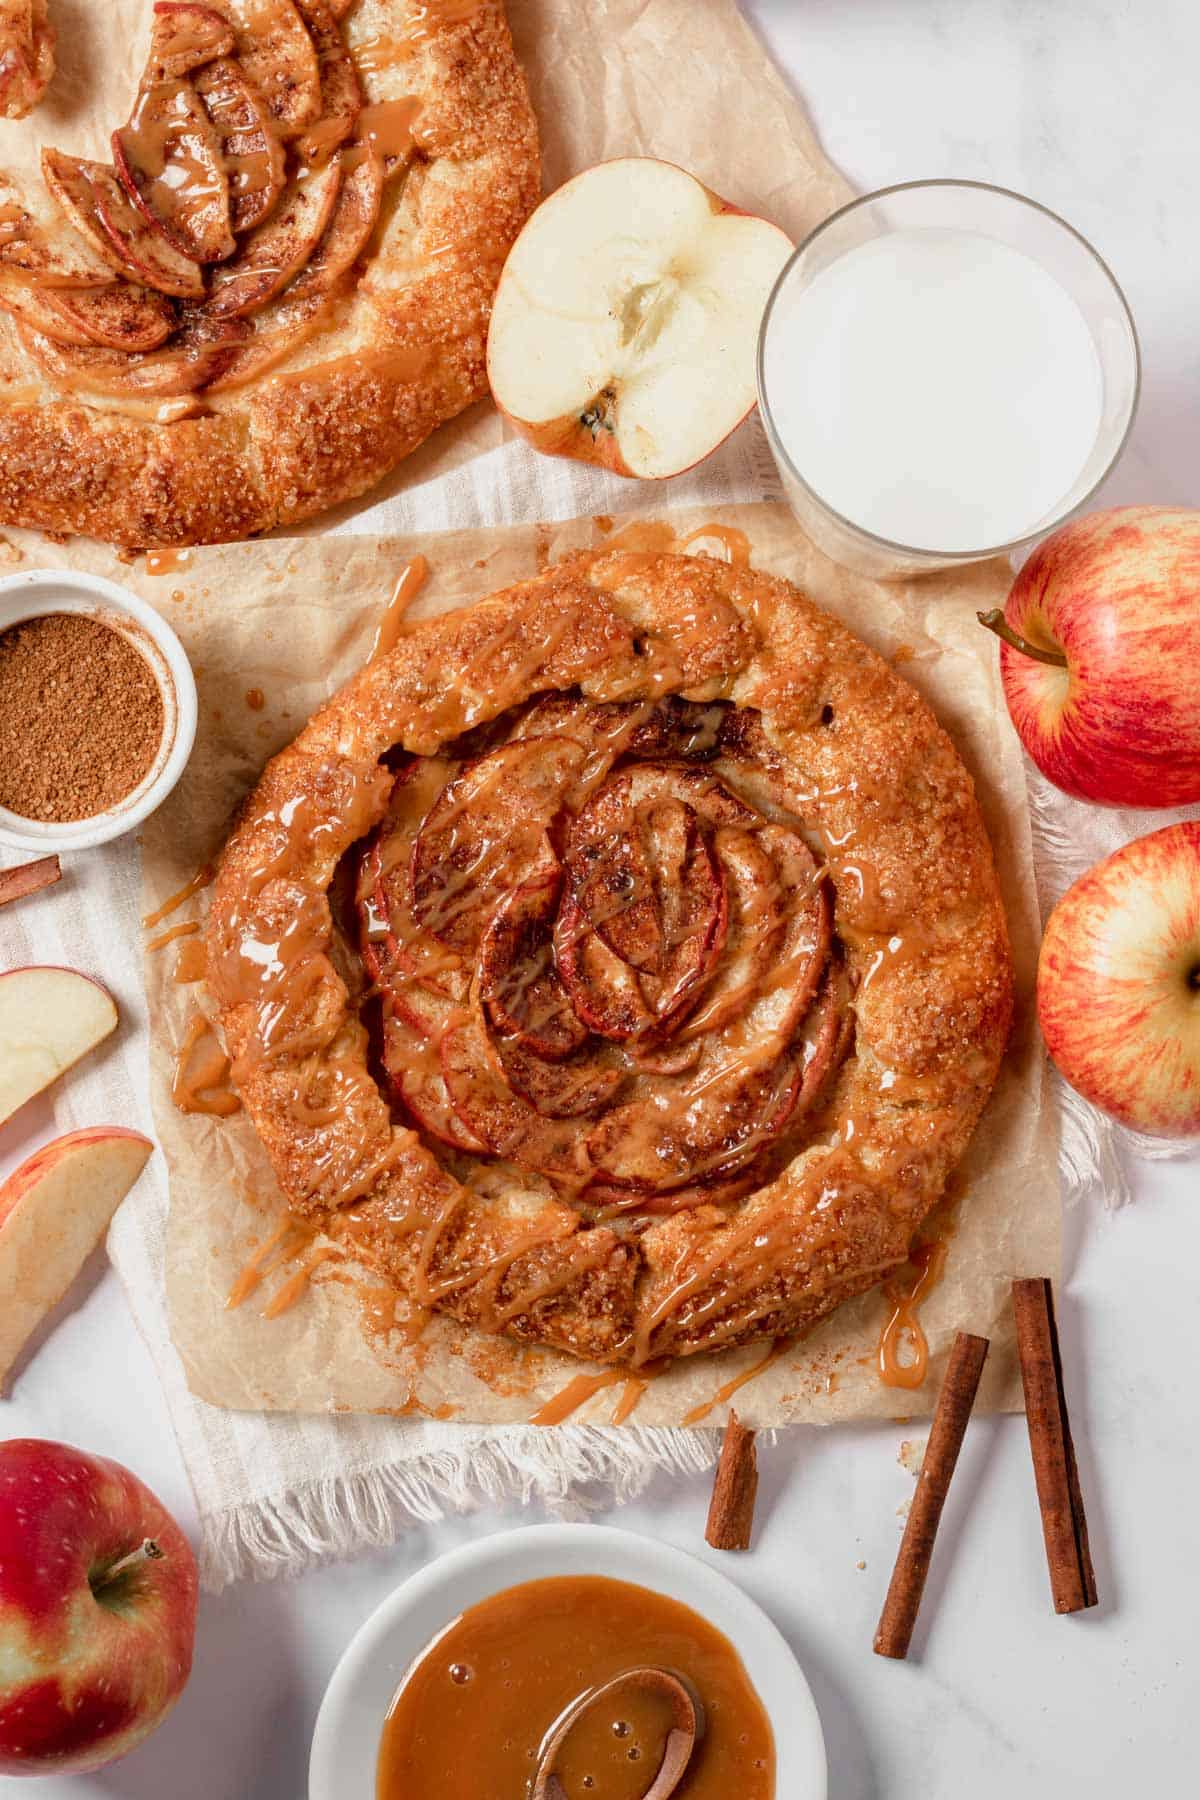
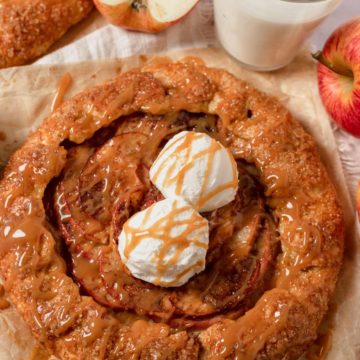
This Rustic Apple Galette recipe is flawless in every way, it has a buttery and flaky crust and juicy cinnamon-dusted apples. Served with tangy caramel sauce and vanilla bean ice cream that melt in your mouth.
If you love fried apples with cinnamon and the flavor of freshly baked apple pie, you gonna love this galette recipe.
Essentially galettes are free-form tarts that are made with butter pie crust dough and your choice of scrumptious filling of sweet fruit or savory veggies.
This recipe makes two large rustic apple galettes that would be enough for 4 servings. Alternatively, you can make 4 smaller galettes in total too.


Apple Galette
Jump To
What Are The Best Apples For Apple Galette?
I love using whatever apples are in season. But combining at least two different types of apples usually gives the best results.
Different varieties of apples cook up faster, become more soft or firm and some are sweeter.
So future proof your baked galette by using a blend of apples in the recipe.
Ideally, you’d like a combination of sweet and tart flavors. Jonagold, Gala, Cortland, Golden Delicious, Honeycrisp, Pink Lady, Granny Smith, Empire, and Braeburn are all great options to mix and match in apple galette recipes.
Here’s a small description of a few:
- Jonagold - has a lovely aromatic flavor and aroma. Sweet and will hold up their shape beautifully.
- Braeburn - sweet and crisp apples also will hold their shape well.
- Honey Crisp - like the name implies they have sweet honey flavor and a little tartness to them. Very juicy and hold their shape really well in baking.
- Granny Smith - tart and crisp and hold up the texture well. Combine these with sweet apples.
- Pink Lady - have a little tart and sweet flavors to them, hold their shape in baking.
- Golden Delicious - sweet apples that hold their shape well But should be cut thicker than others as they tend to soften more.
Ingredients
- Sour cream - acts as a binding agent here, I recommend using 18% to 20% fat sour cream or thick greek yogurt would be another solution here.
- Egg yolk - for brushing the rustic galette edges for a perfect crust and golden brown color and appetizing aroma.
- Swap the apples - for peaches, nectarines, plums, pears, blackberries, or a combination of your favorite fruits and berries. You can stuff this galette with anything, including savory flavors.
- Butter - unsalted butter cubes. Cut them some time in advance and keep them in the fridge so they are cold enough as the recipe requires. Substitute butter with coconut fat and skip the egg for a vegan galette.
For the full list of ingredients, please scroll down where you'll find the recipe card.

Instructions
In a large bowl combine flour, sugar, and salt.
Add in very cold butter, in small cubes, and massage until it looks and feels crumbly.
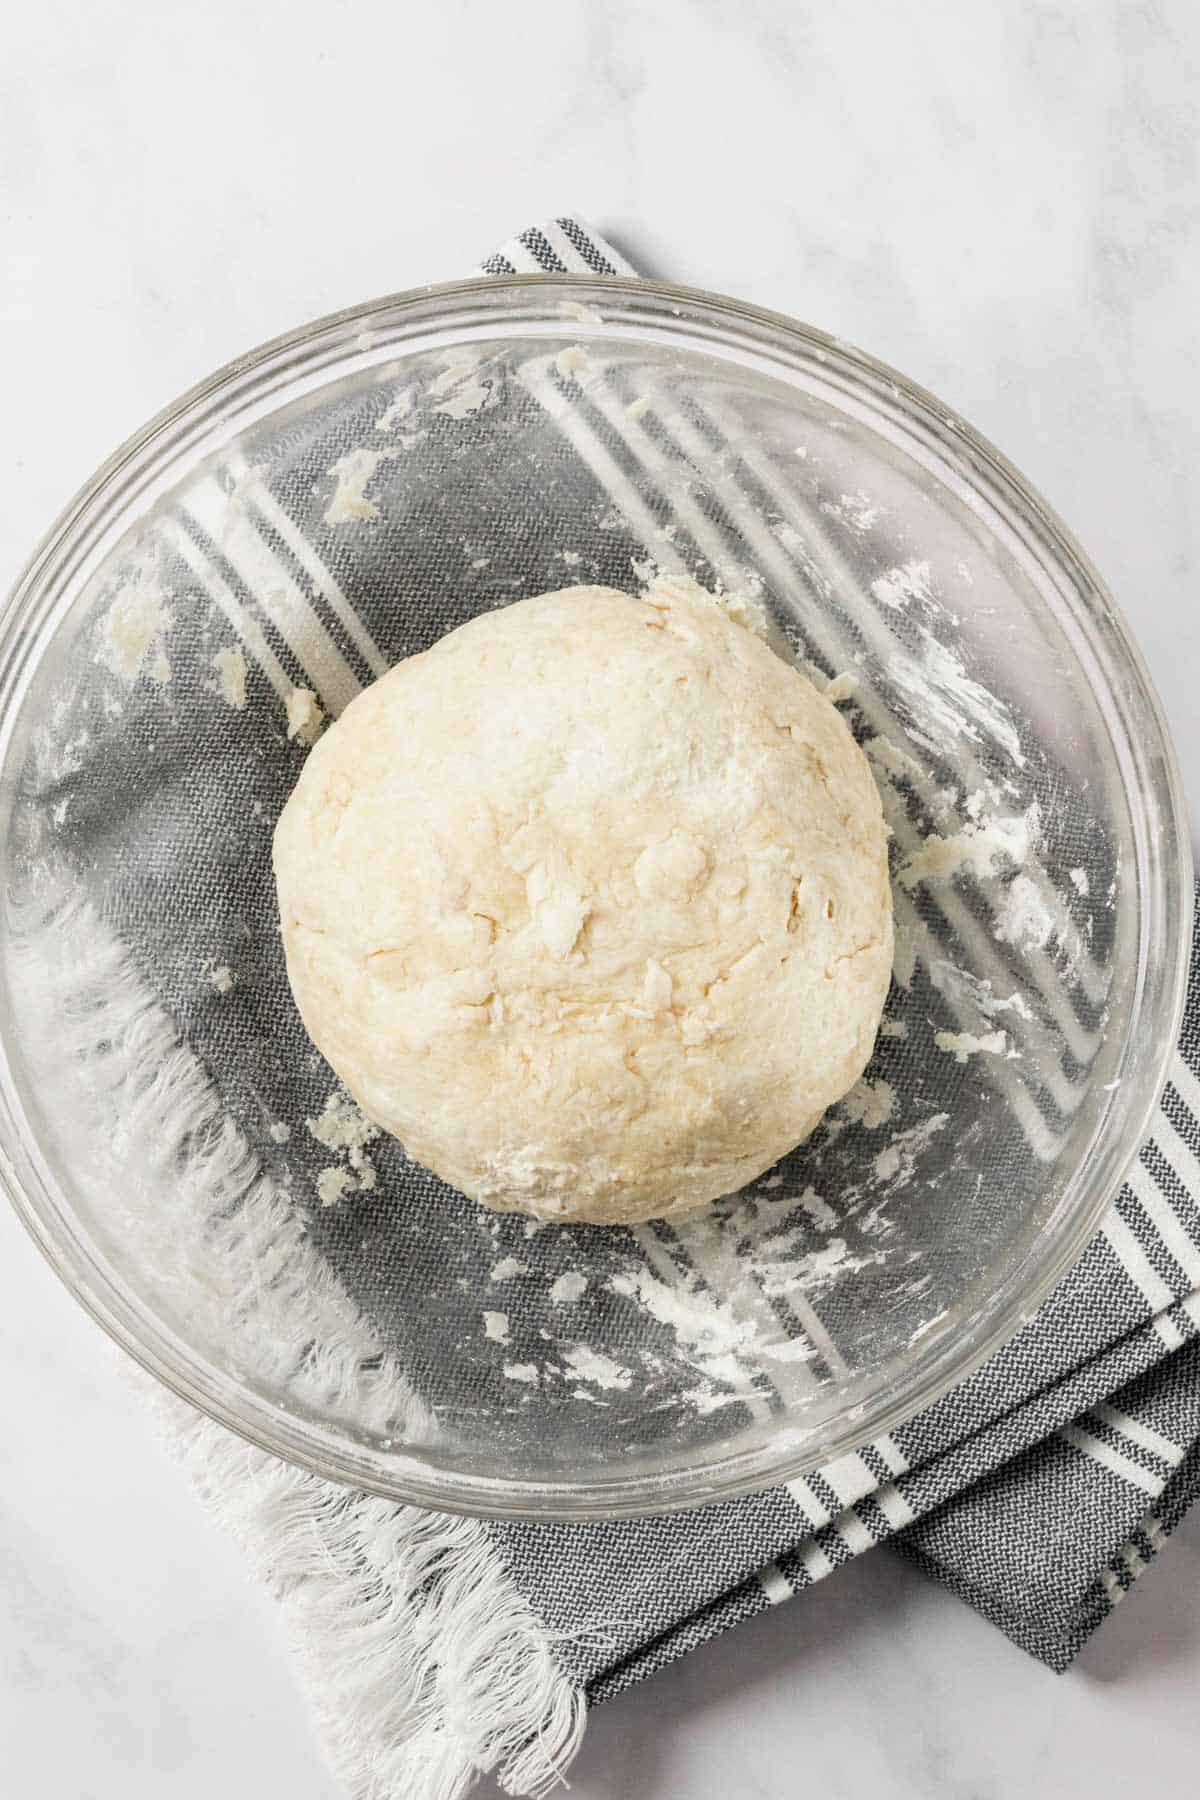
Follow with cold sour cream, and stir to combine until the batter comes together. You have to work fast or use a food processor.
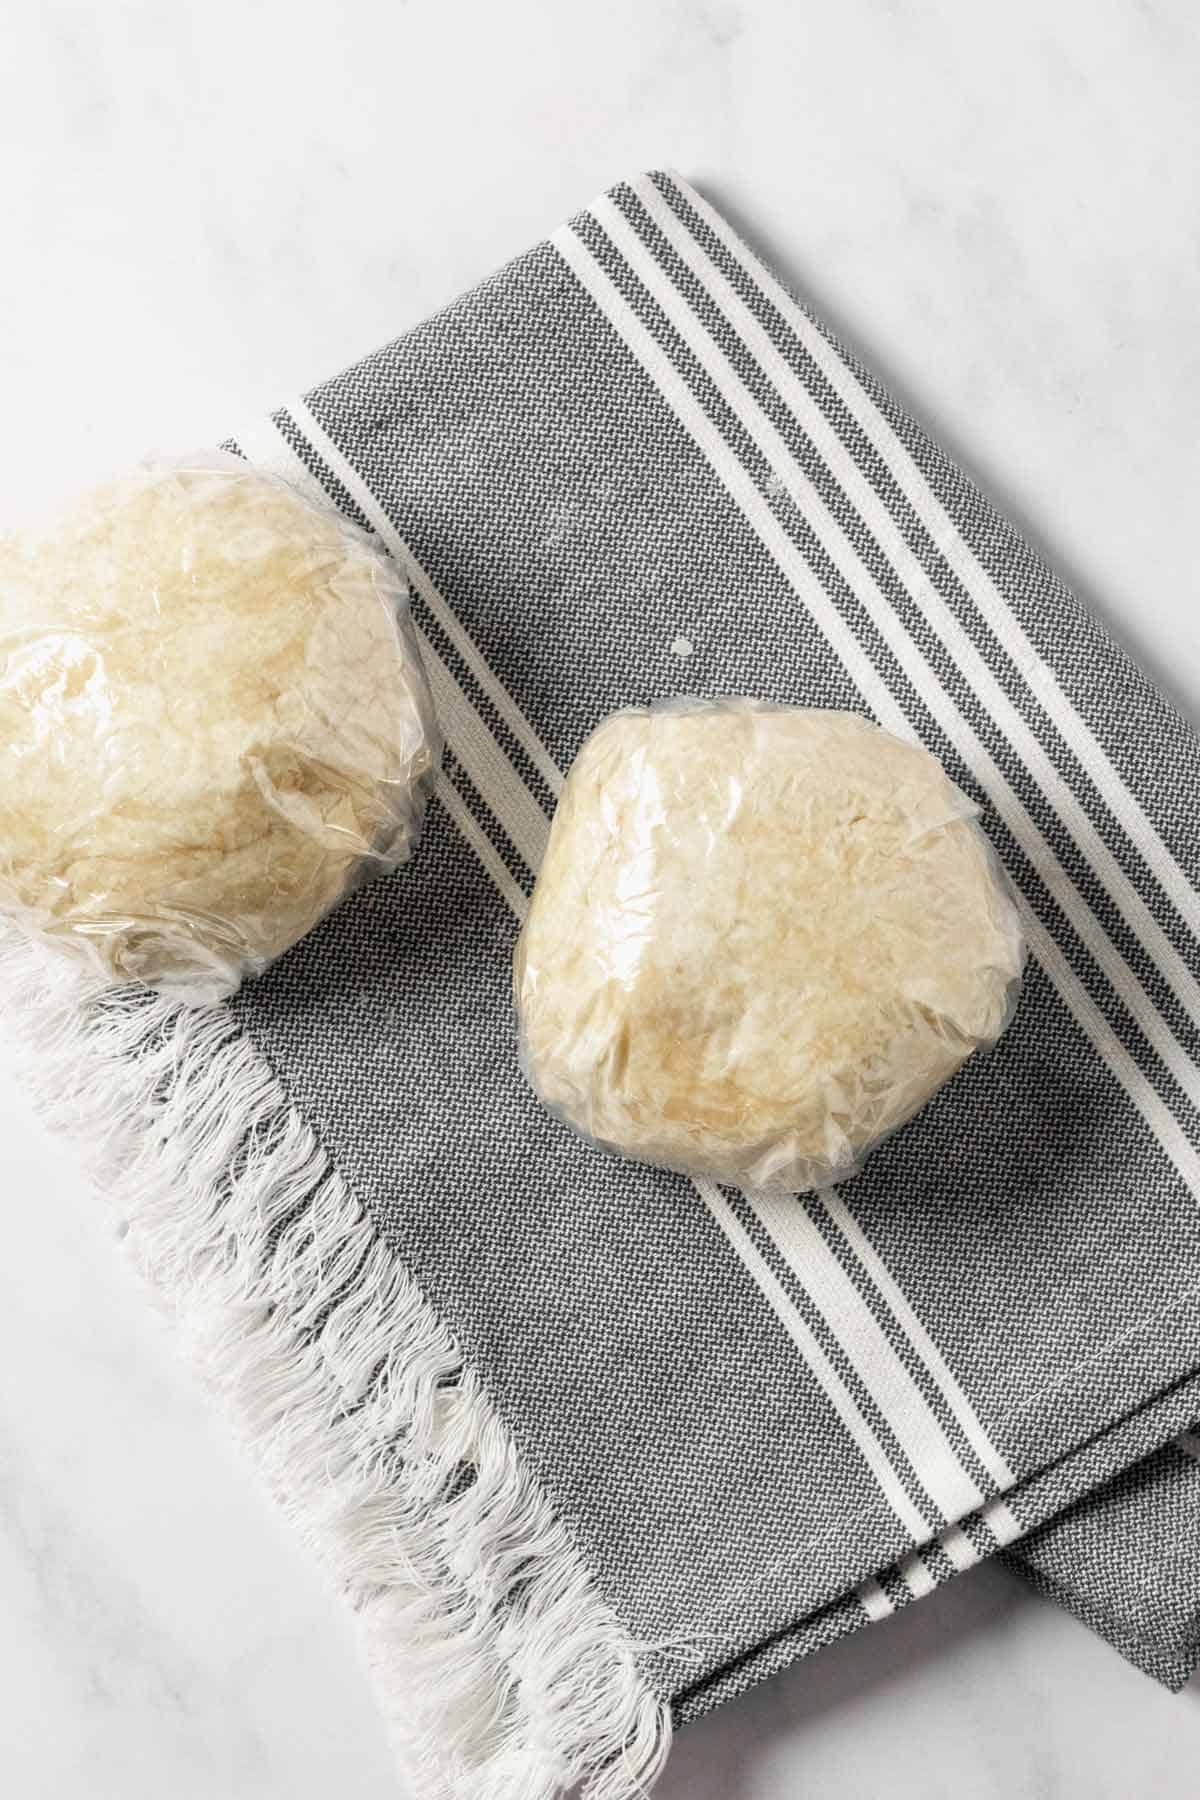
Shape into a large ball and divide into 2. Roll each into 2 smaller balls and tightly wrap with plastic wrap. Transfer to the fridge for 45 minutes.
Once you are ready to take out the dough, prepare the next step first.
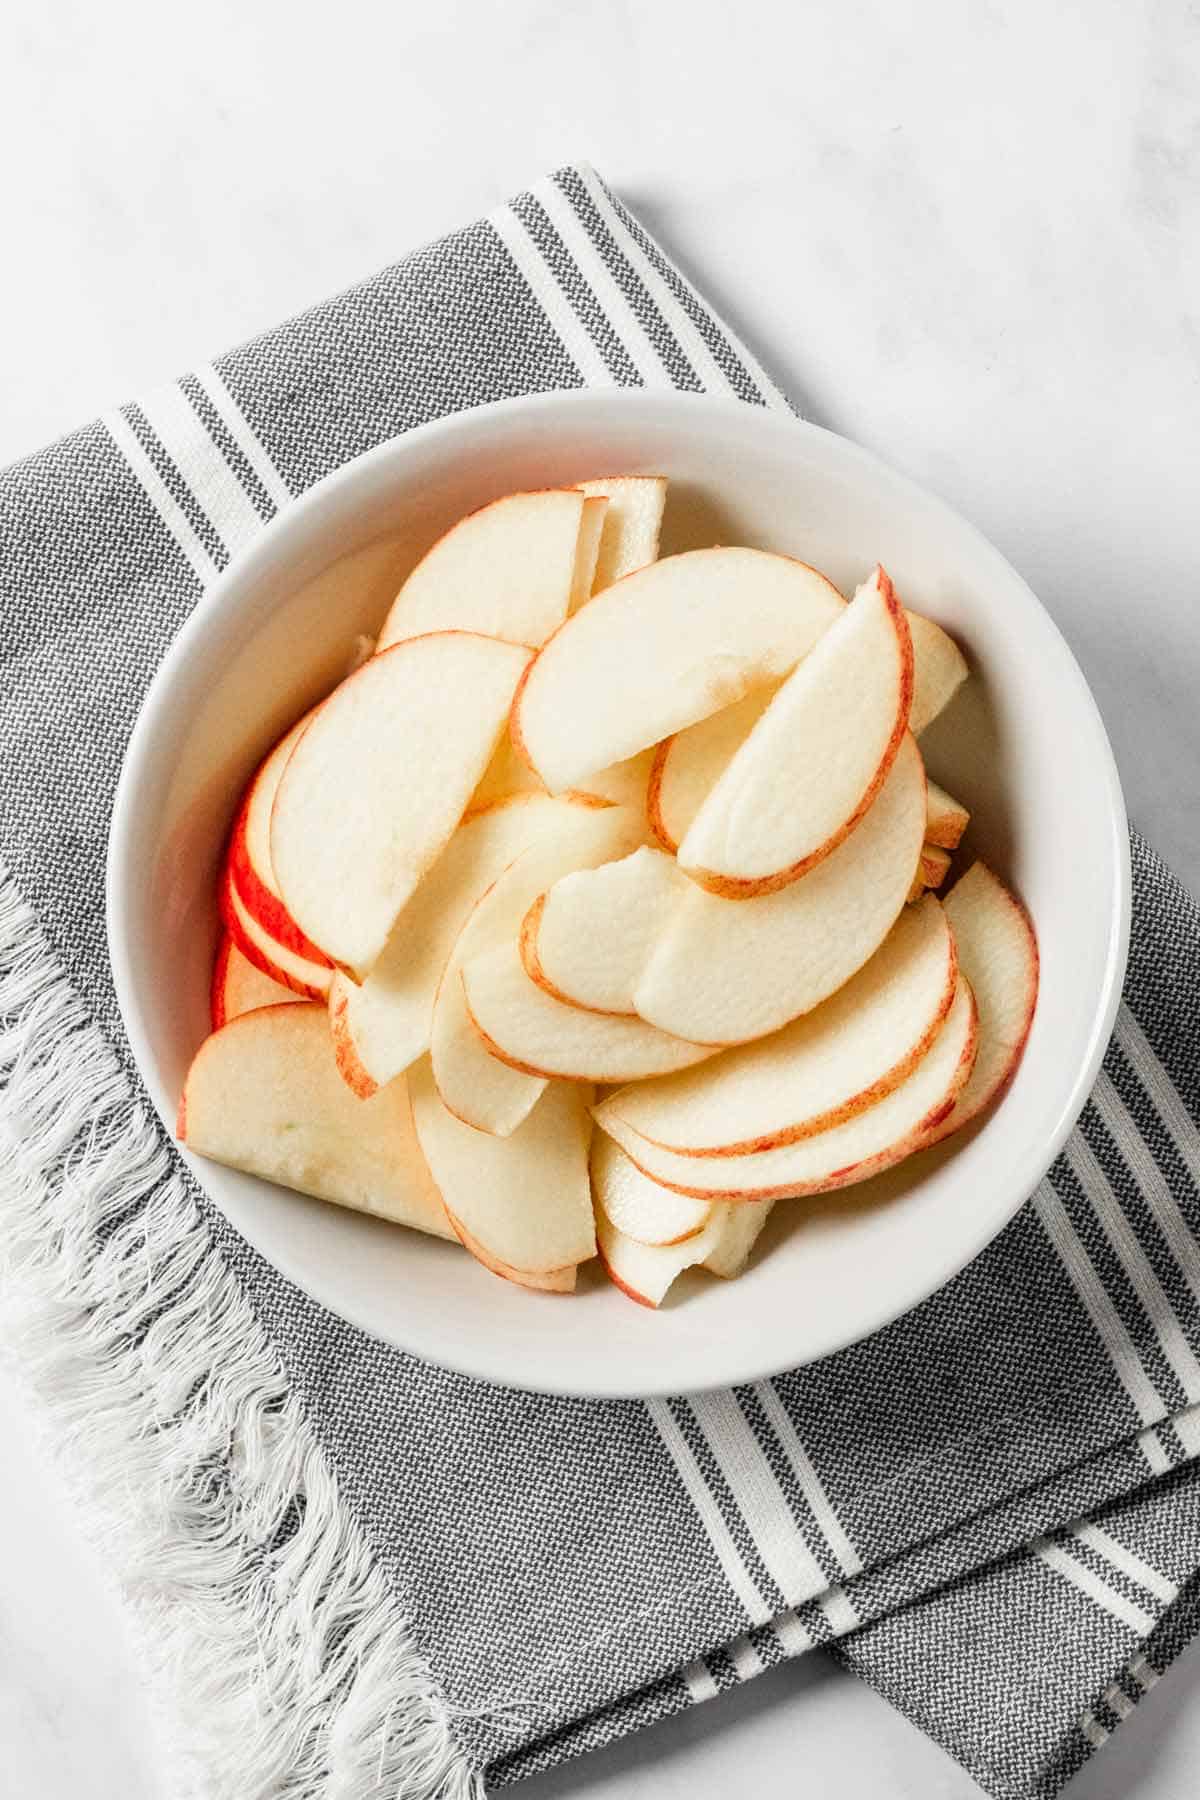
Slice the apples (about ⅛ inches thick ), and drizzle them with lemon juice to prevent too much browning (they will still brown a little, which is fine too).
Cover with a wet kitchen towel on top.
You’ll need 1 large baking sheet per galette. If the oven is smaller, just work with one ball at a time, keeping the other one in the fridge for longer. It’s okay, you can refrigerate the dough for 3-4 days.
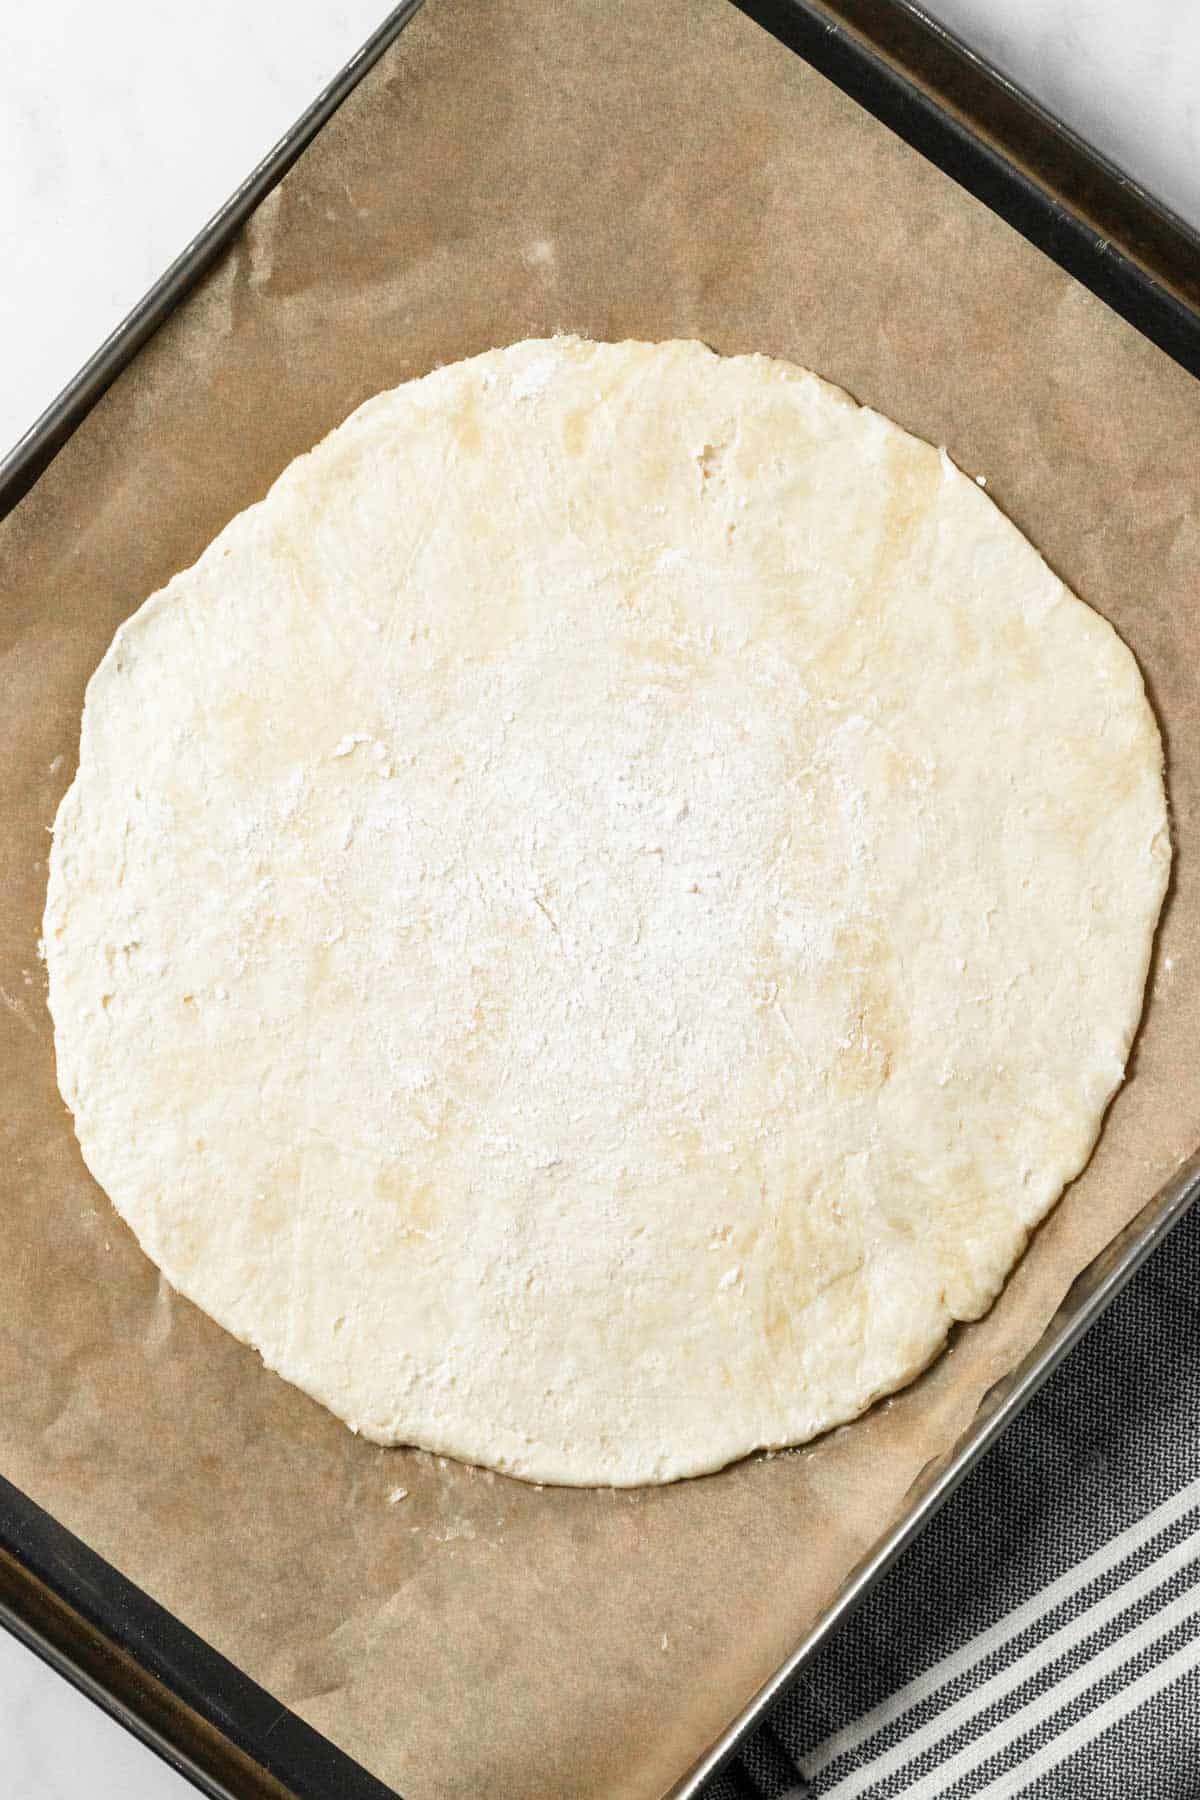
Preheat the oven to 350 F (180C). Remove the dough from the fridge, and discard the plastic wrap. Place each ball onto parchment paper.
Roll the dough out in a flat circle, about 10 inches wide. Sprinkle little flour for easier handling.
If the edges are not even, it’s okay, we can hide and ‘’even’’ them out with just our fingertips. It’s a rustic galette, after all!
The dough should not be sticky if refrigerated properly, you should be able to easily work with it. It will start to become sticky the longer it sits on the kitchen counter.
Once ready, transfer the dough with the parchment paper onto the baking sheet.
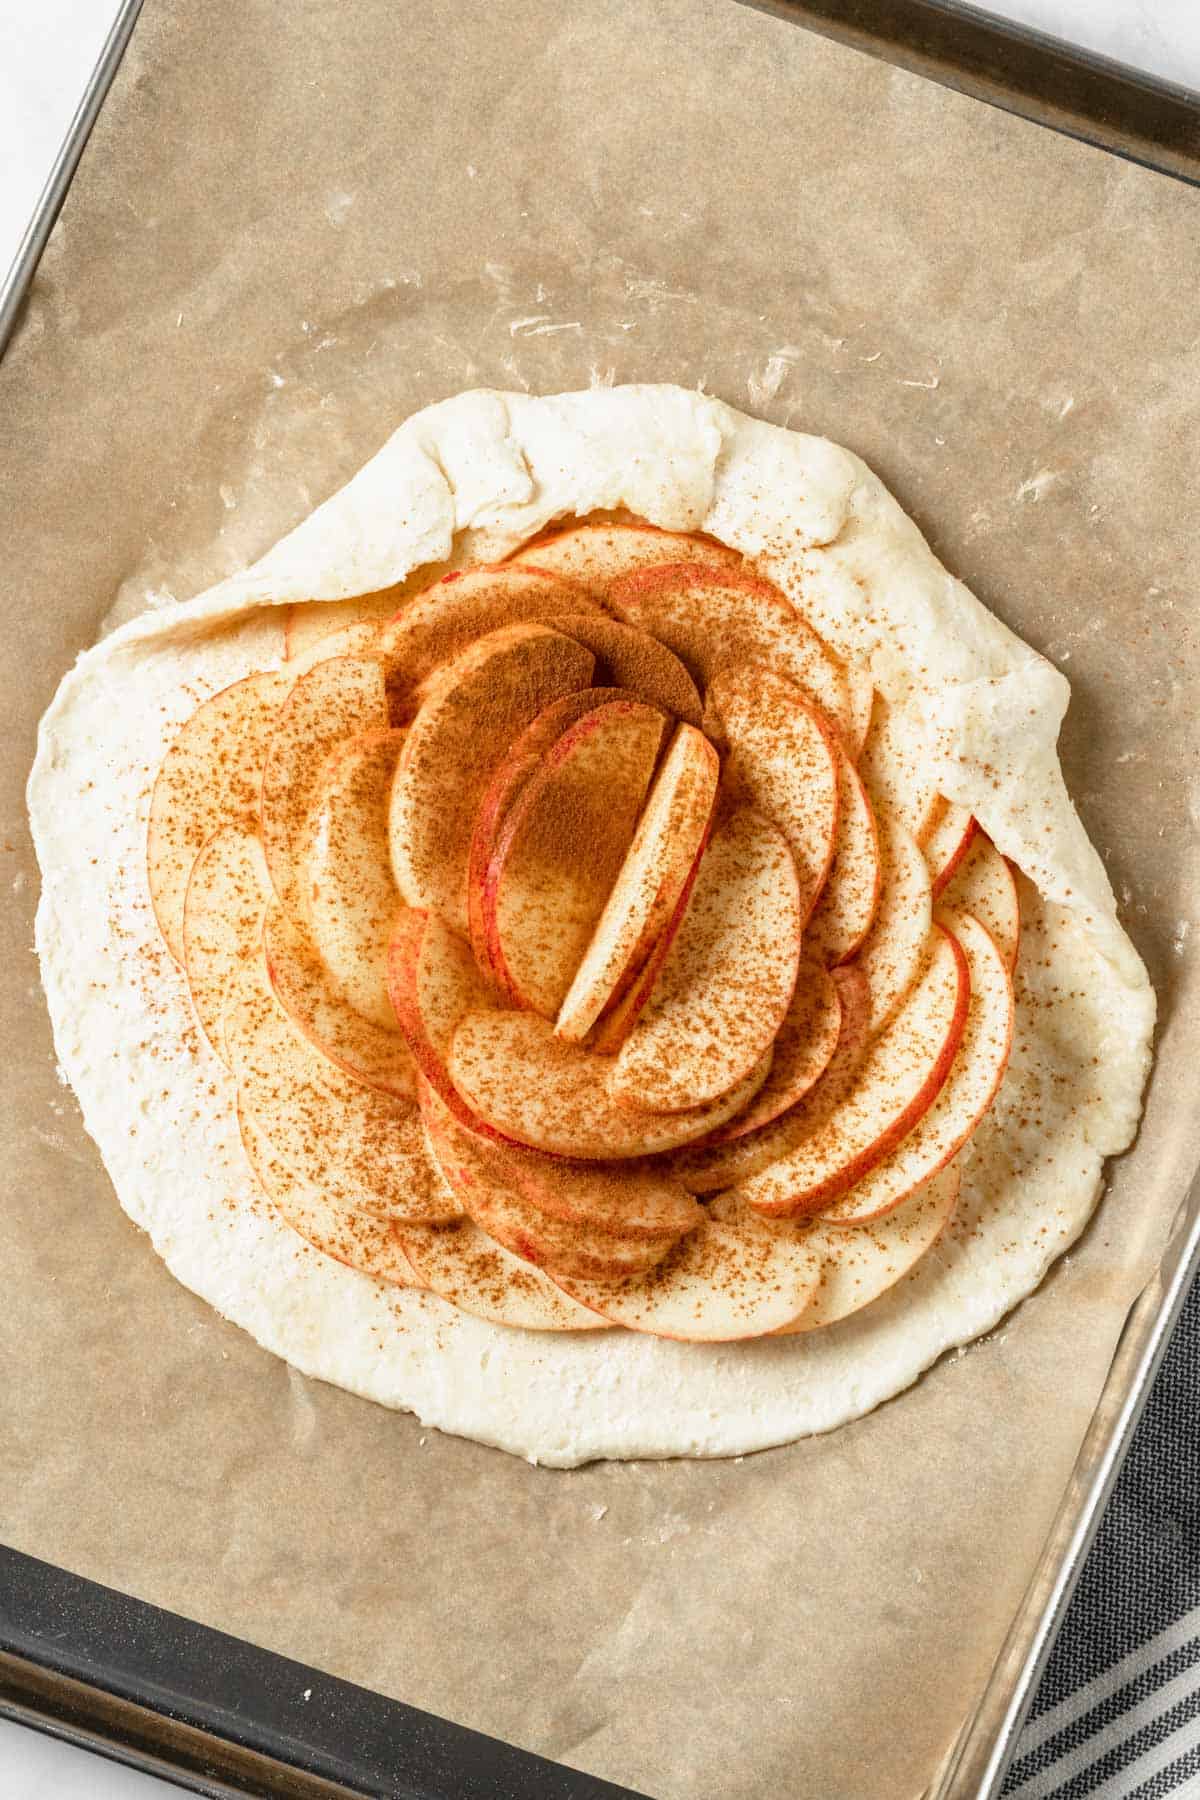
Sprinkle cornstarch all over the center part of the galette (where you’re going to layer the apples), 1 tablespoon per 1 galette.
Arrange apple slices in the middle of the galette leaving about 1 ½ to 2 inches on the outer edges that we are going to fold in very soon.
Dust the apples with cinnamon, about 1 teaspoon per galette.
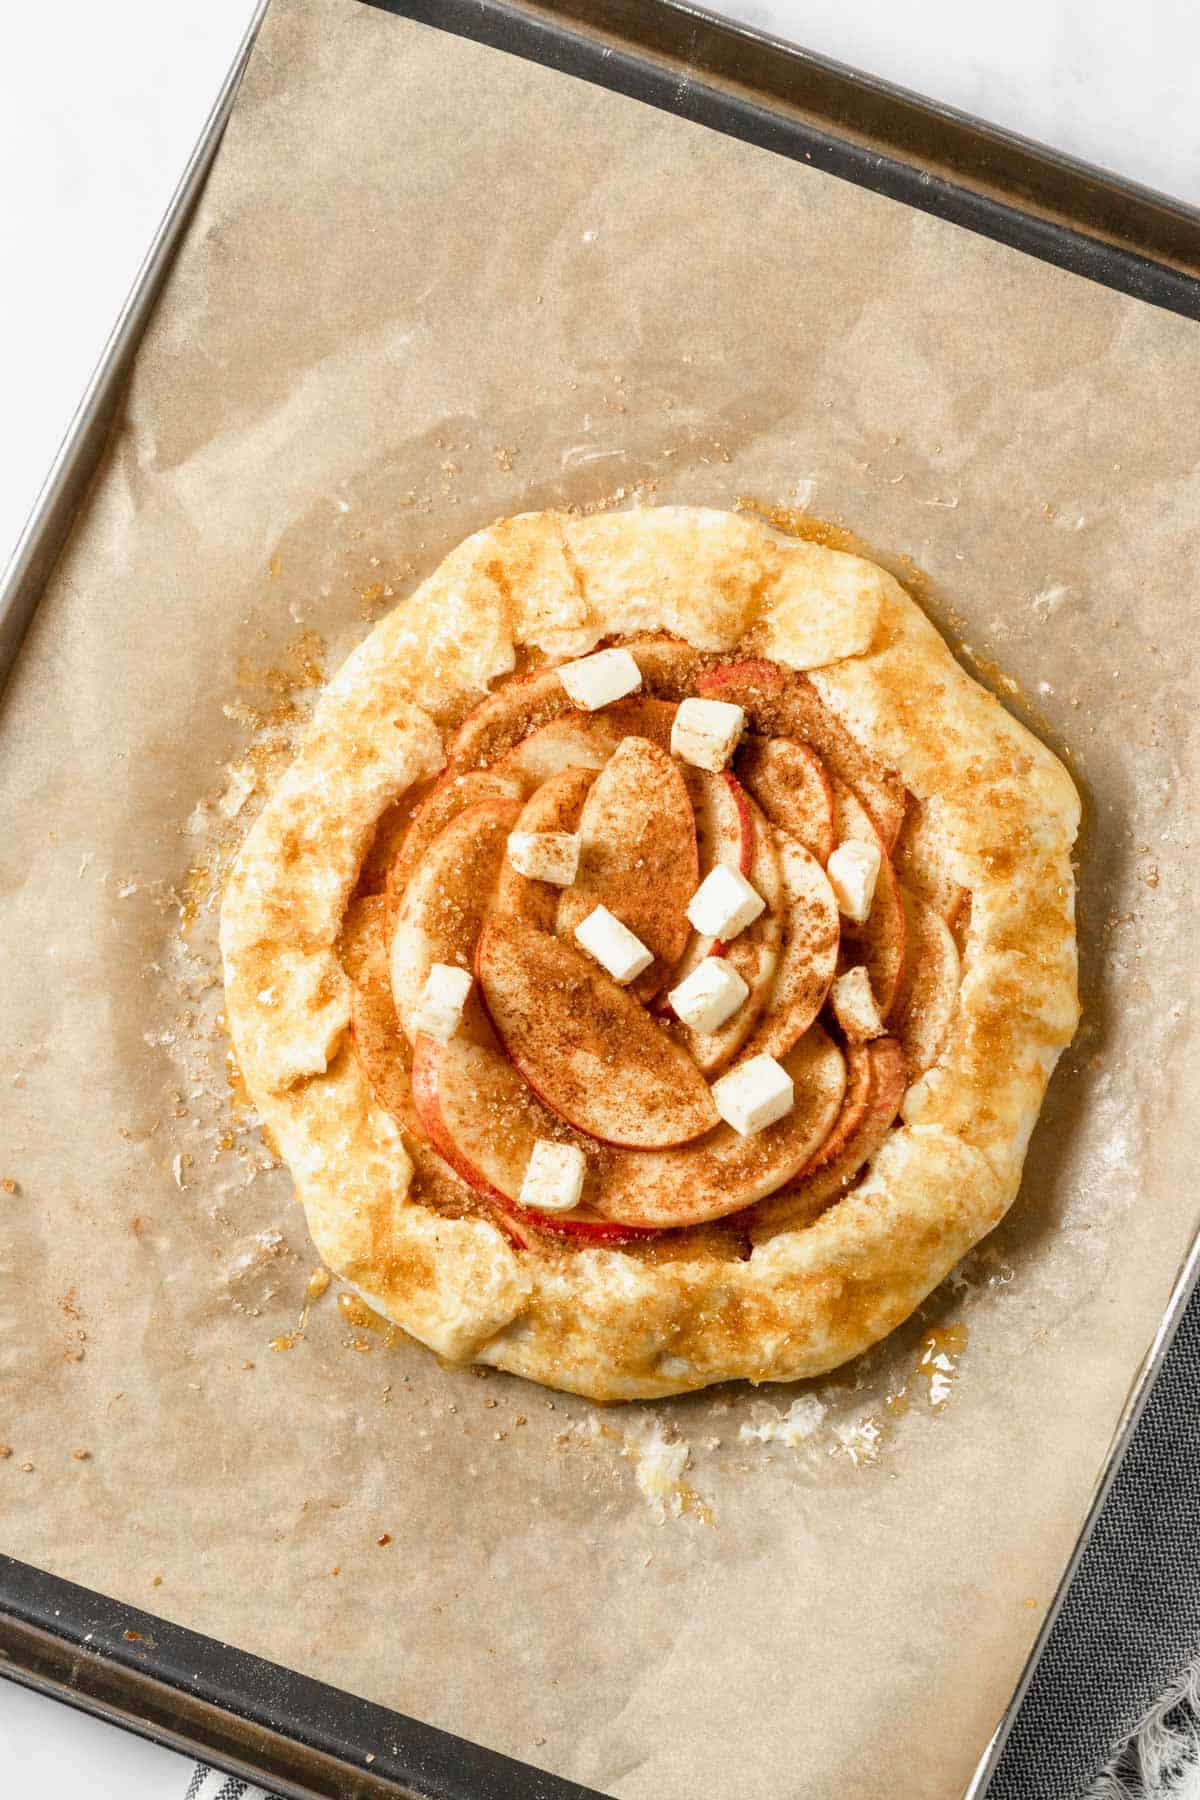
Top with cold butter cubes, 1 tablespoon per galette.
Fold in the edges and generously brush with beaten egg yolk.
Sprinkle brown sugar all across the galette, or just the edges (personal preference).
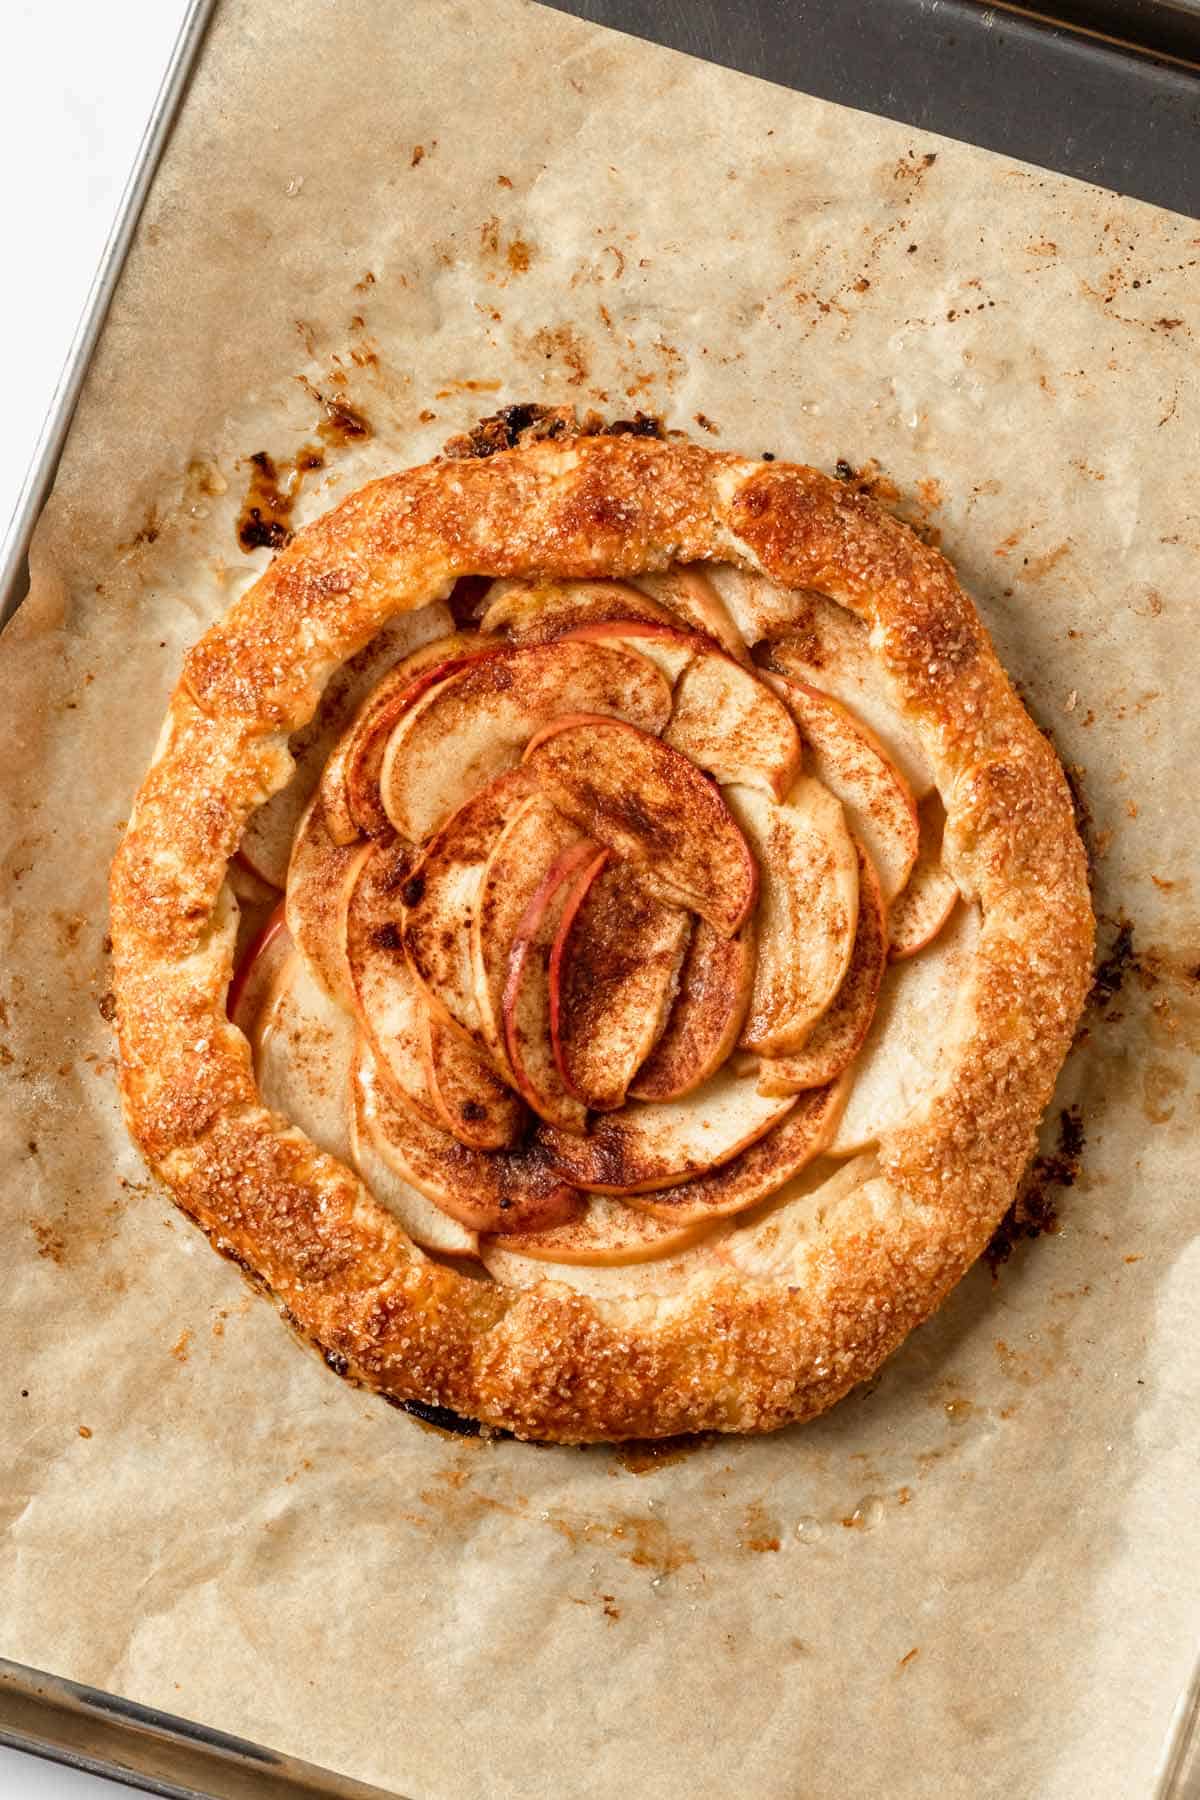
Bake for 40-50 minutes until the edges become beautifully golden brown.
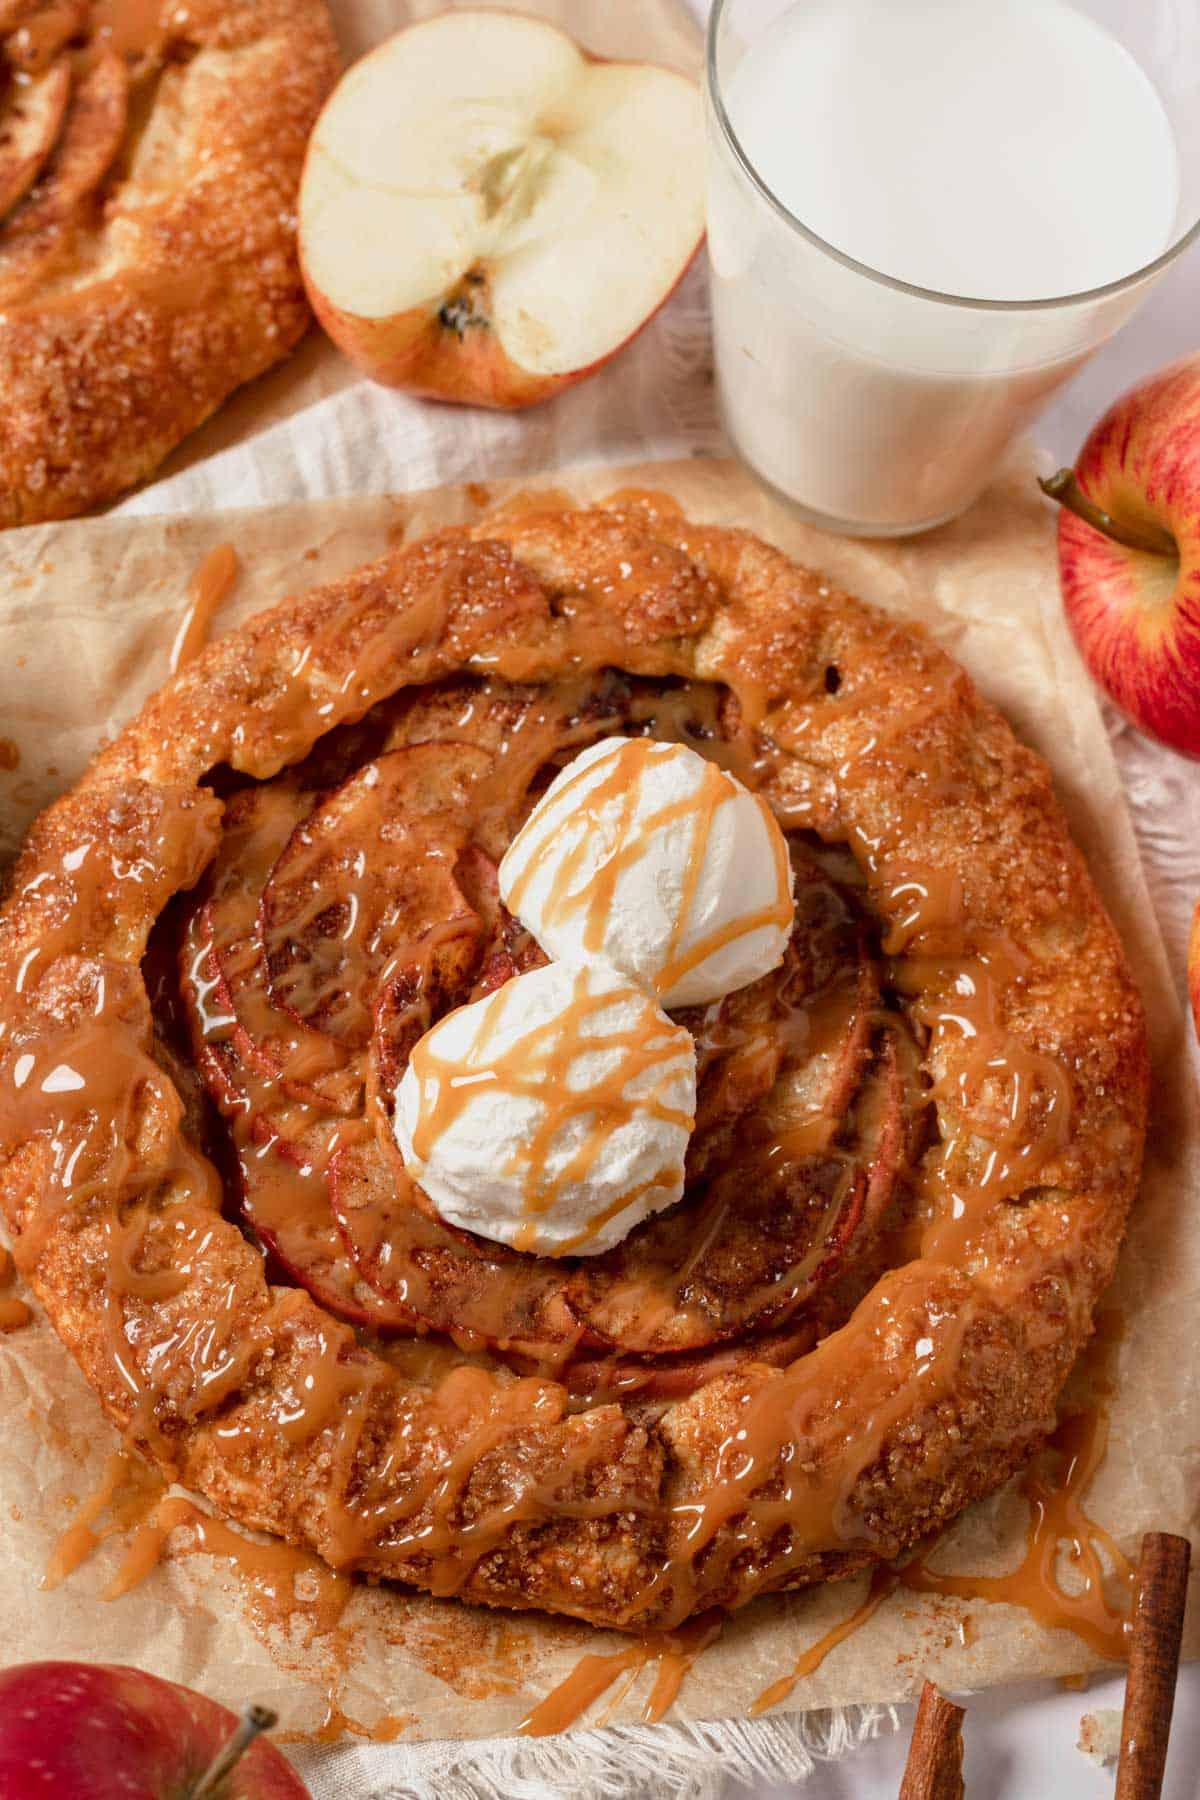
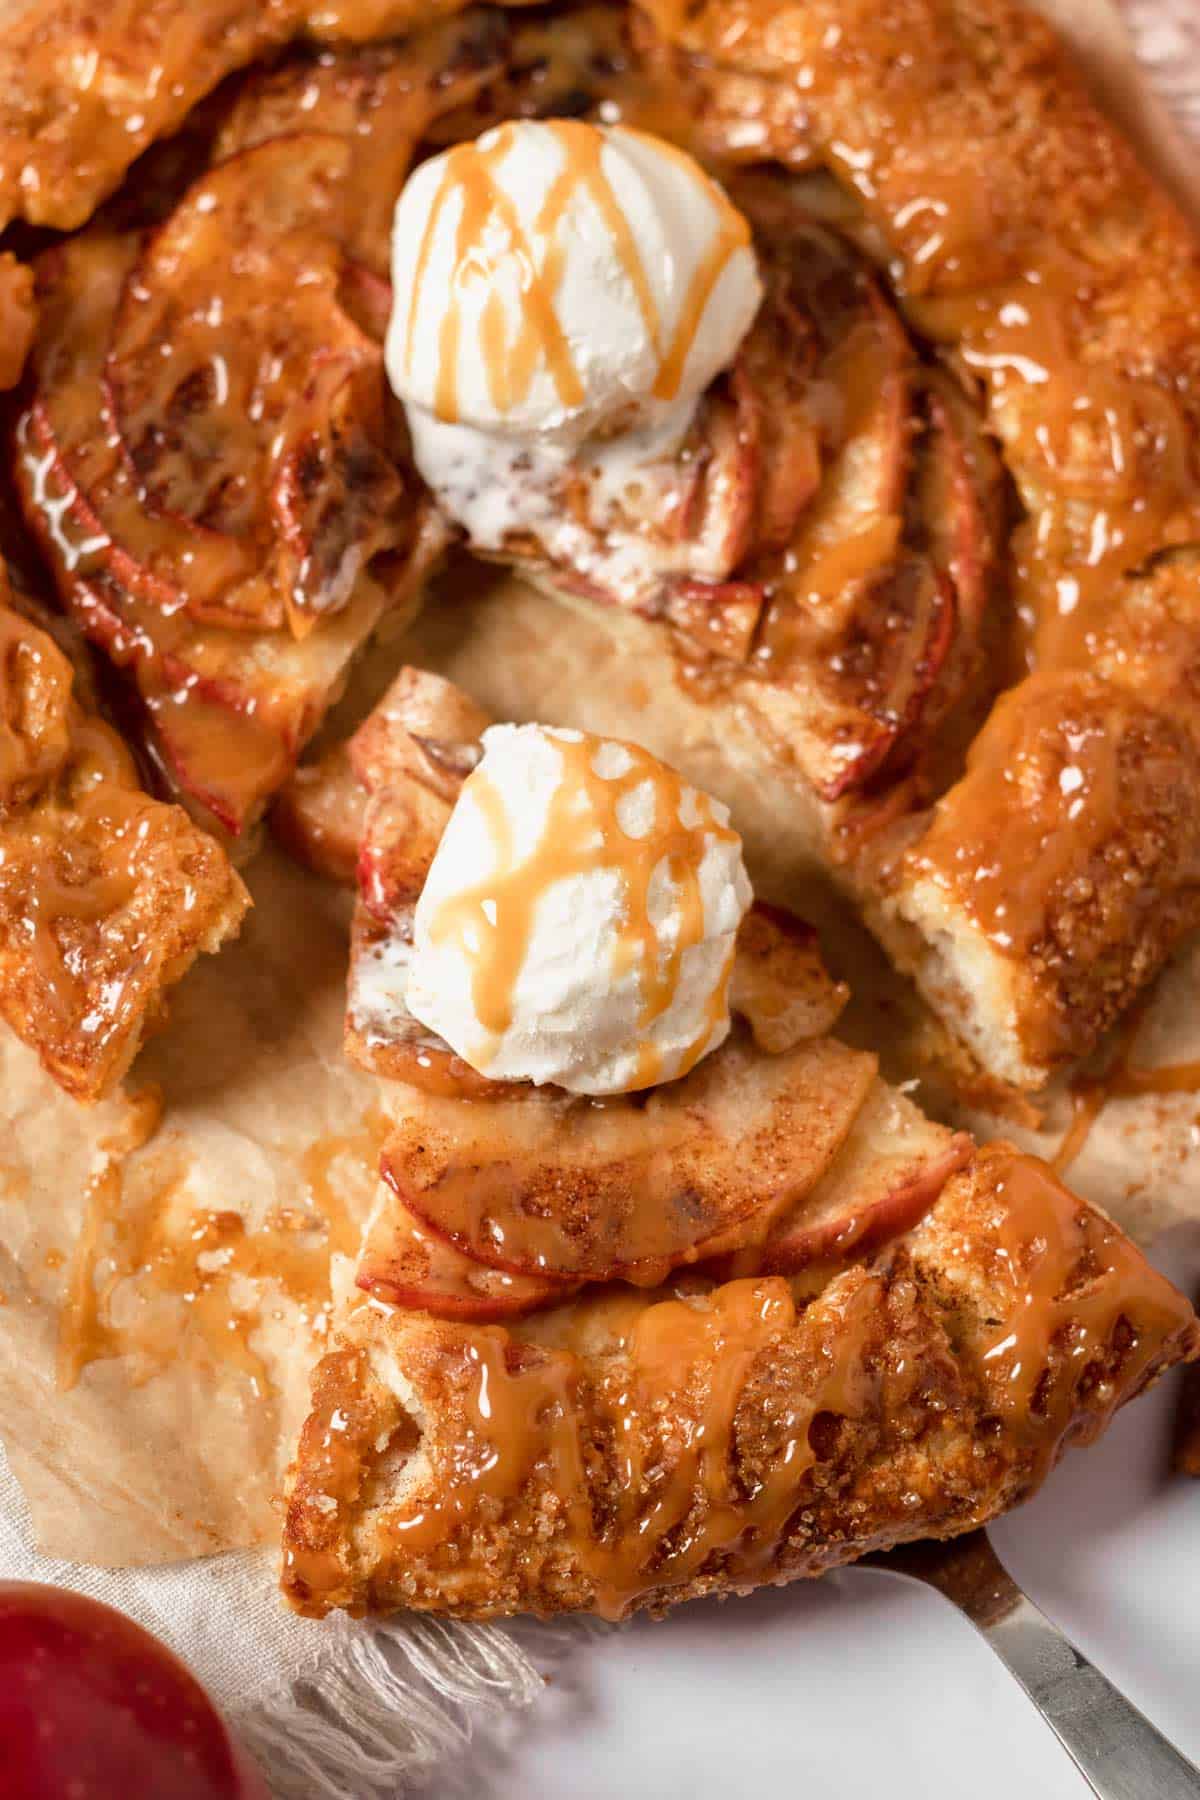
Remove from the oven, let cool and enjoy as it is or top with peach, apricot, or berry jam and enjoy right away.
Or tangy caramel sauce with vanilla bean ice cream sounds great too!
Tips
- Best to consume right away while still warm, but can be refrigerated for a maximum of 2 days.
- Reheat in a warm oven until softened.
- The dough - after refrigerating it should not be sticky, if it is, refrigerate more. I have baked this galette with the slightly sticky dough too and honestly, the difference was very minimal. It’s just easier to work with the dough when it’s not sticky.
- You don’t have to use a food processor for the first step. You can easily make it by hand. It may take some trial and error though.
- Herbs - for a fun experiment, add fresh thyme sprigs and/or oregano leaves to your galette before baking. You’ll be surprised how this interesting floral element elevates the flavor of the apples and overall adds a nice dimension to these galettes.
- We love serving our rustic apple galette with caramel sauce, ice cream, and of course with a fruit jam/jelly brushed all over apples after baking. My personal favorite is the apricot jam!
- Try another fun galette variation we love to make - Strawberry Galette with Rhubarb Jam.
Freezing and Storing Instructions
To Store. Wrap the unbaked galette dough in plastic wrap and store it in the fridge for 3-4 days. The baked apple galette will keep in the fridge for 1 or a maximum of 2 days.
Reheat in a warm oven until warmed through. For best results consume it right away while it is soft and flaky.
To Freeze. Unbaked galettes will keep fresh in the freezer for 3-4 months.
Make Ahead. Galette dough can be made in advance and chilled in the fridge for 3-4 days until ready to bake. For best results, I recommend cutting the apples or berries right before baking.
Best Toppings For Apple Galette
There’s no doubt these rustic apple galettes are mouth-watering and melt-in-your-mouth delicious on their own.
But we don’t hold back and like to top these pies with homemade coconut caramel sauce, pumpkin caramel sauce, along with vanilla ice cream and/or berry jam.
FAQ
Pies and tarts are baked in a mold or dish, however, galettes are freeform shaped and come with fruit or savory fillings. These are similar to tarts but are laid on a flat sheet with their edges turned up and folded inward by hand creating a rustic look to it.
You can add a little cornstarch in the center of the galette before adding the filling which will help prevent excess moisture. And also brushing the interior crust with egg white is a proven method in pastry to prevent soggy bottom.
Apple galettes are best consumed right away while warm and fresh. The dough will be at its ‘best’’, soft, flaky and moist. Refrigerate baked galettes in the fridge for a maximum of 2 days.
Reheat in a warm oven until softened.
You can use prepackaged puff pastry for galettes. The end result will have a more ‘’airy’’ flaky crust and the galette will be thinner than with homemade galette dough. The baking time may need to be adjusted too.
Galettes of any kind can be eaten warm or cold with additional toppings such as ice cream, jams, and caramel sauce. If the galette is bigger than 1 serving slice it into triangles and enjoy!
Essentially there is no rule of thumb on how to serve galette. For a tastier experience, we like to serve our rustic apple galettes warm.
Easy Dessert Recipes

📖Recipe
Rustic Apple Galette With Caramel Sauce
Ingredients
Dough
- ½ cup unsalted butter, very cold cubes (you can flash freeze it before) (113g)
- 1 teaspoon salt
- 1 cup sour cream, at least 20% I think 18% should be ok too
- 2 cup all purpose flour
- 1 tablespoon white sugar
Filling
- 4 medium apples, royal gala, golden delicious, jonagold), sliced into thin wedges
- 2 teaspoon cornstarch
- 4 tablespoon brown sugar, I used demerara (or other regular brown sugar with larger crystals)
- 2 tablespoon unsalted butter, cold
- 2 teaspoon cinnamon ground
- 1 egg yolk, beaten
For serving
- Powdered sugar, caramel sauce, ice cream
Instructions
- In a large bowl combine flour, sugar, and salt.
- Add in very cold butter, and small cubes, and massage until it looks and feels crumbly.
- Follow with cold sour cream, and stir to combine until the batter comes together. You have to work fast or use a food processor.
- Shape into a large ball and divide into 2. Roll each into 2 smaller balls and tightly wrap with plastic wrap. Transfer to the fridge for 45 minutes.
- Once you are ready to take out the dough, prepare the next step first.
- Slice the apples (about ⅛ inches thick ), and drizzle them with lemon juice to prevent too much browning (they will still brown a little, which is fine too). Cover with a wet kitchen towel on top.
- You’ll need 1 large baking sheet per galette. If the oven is smaller, just work with one ball at a time, keeping the other one in the fridge for longer. It’s okay, you can refrigerate the dough for 3-4 days.
- Preheat the oven to 350 F (180C). Remove the dough from the fridge, and discard the plastic wrap. Place each ball onto parchment paper.
- Roll the dough out in a flat circle, about 10 inches wide. Sprinkle little flour for easier handling. If the edges are not even, it’s okay, we can hide and ‘’even’’ them out with just our fingertips. It’s a rustic galette, after all!
- The dough should not be sticky if refrigerated properly, you should be able to easily work with it. It will start to become sticky the longer it sits on the kitchen counter.
- Once ready, transfer the dough with the parchment paper onto the baking sheet. Sprinkle cornstarch all over the center part of the galette (where you’re going to layer the apples), 1 tablespoon per 1 galette.
- Arrange apple slices in the middle of the galette leaving about 1 ½ to 2 inches on the outer edges that we are going to fold in very soon.
- Dust the apples with cinnamon, about 1 teaspoon per galette.
- Top with cold butter cubes, 1 tablespoon per galette.
- Fold in the edges and generously brush with beaten egg yolk.
- Sprinkle brown sugar all across the galette, or just the edges (personal preference).
- Bake for 40-50 minutes until the edges become beautifully golden brown.
- Remove from the oven, let cool and enjoy as it is or top with peach, apricot, or berry jam and enjoy right away.
- Or tangy caramel sauce with vanilla bean ice cream sounds great too!
Our family loves easy desserts and baking, besides this Easy Apple Galette, our favorites lately have been Oreo Brownies, Peach Cobbler Cake and Old-Fashioned Oatmeal Cookies.

Rita
A super easy apple galette recipe that can be customized with other fruit or savory flavors!